Hi!
This is a Mega-Update ®™ that focuses on features that people have been requesting for a long time.
I have a ton of stuff in Miegakure that could be shared with 4D Toys but what takes development time is not the cool 4D stuff but all the UI/UX around it. First of all because there is the VR version, the mouse/keyboard version, and the touchscreen version, which all require slightly different custom interfaces, but also because I always want to have the 2D/3D levels to show the lower dimensional version of the same thing, in order to explain what is actually going on. So that’s like six different variations!
But in any case, here is a large batch.
1. Rotating your 3D slice arbitrarily in 4D
Obviously an often requested feature! The fun part was coming up with a simple interface: If you just rotate the 3D slice around the camera you might make the level completely invisible, because it doesn’t belong to your slice anymore, or at best is off to the side in 3D.
My goal was to design the interface to let players focus on the cool 4D stuff instead of the camera/slice orientation/position. For example there is still no real need to move the camera around the level, as the level is always in front of you no matter how you rotate in 4D!
Incidentally, you can also hold a shape while you rotate your slice and it will rotate with you!
The interface combines both continuous and discrete 90 degree rotations: you can use the arrows to rotate the slice in 90 degree increments, similar to Miegakure’s main mechanic. This is important because axis-aligned rotations are the easiest to understand!
The three colored lines represent the three horizontal dimensions. You can trade which of these dimensions you can see by using the new rotation controller.
For example: The level above is sloped, and you can either see the slope but not the 4th dimension, or you can see the 4th dimension but not the dimension that slopes down. So it looks like the level is flat sometimes, but it’s just that you cannot see the slope. (There’s a 2D/3D level that show this).
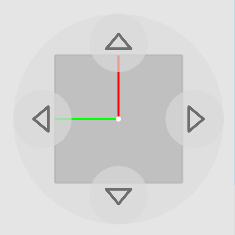
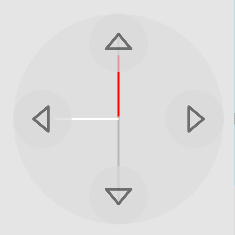
The 2D/3D mode helps understand what that means, but you can also just play around with it! 4D Toys and Miegakure are two different complementary approaches to explaining the fourth dimension. 4D Toys is about playing with 4D in a high-bandwidth, undirected way, and Miegakure is one giant subtle and detailed tutorial.
(I wrote about this in more detail in the 4D Toys release post)
2. Projection of the 2D Faces of the 4D objects
That means that no matter where the slice is, the faces of the objects will always be visible. It’s an “old school” and very mathy way of displaying 4D objects which you may have seen before! The projections are useful to roughly see where there are 4D objects, but that’s about it because it’s very easy for the projections to overlap too much.
I’ve had an even cooler version of that in Miegakure since the beginning… and which will show up in 4D Toys at some point!
You can also enable the colored version of the wireframe mode by long-pressing the wireframe button (I realize this is pretty hidden right now … sorry).
3. A lot of structures made to play with “marbles” and roll them around
I made these scenes where you can play with marbles that roll around on interesting terrain shapes. They took very little time to make because of the 4D procedural mesh generation systems I built. I think the most fun part is seeing the spheres shrink/disappear then reappear/grow while they roll down a path that curves in the fourth dimension. It’s also neat to see them move on the projection then re-appear into your slice.
I found it interesting that it was kind of hard to come up with many more interesting paths than these… I think this is because 4D objects are just moving along 1D paths, even if these paths are embedded in 4D!
4. Constant Torque scenes
I added scenes with Tesseracts that are fixed at a point but with a torque that keeps them rotating. This includes a couple of scenes with a double rotation: two perpendicular planes of rotation at the same time. In four or more dimensions, an object can rotate in more than a single plane at the same time. It’s fun to stop one rotation while the other keeps happening.
5. The 1D version of the 2D “Davinci” 4D Objects
This is similar to the shapes I made that were inspired by these Davinci Drawings (see this blog post), but it is the 1D version instead of the 2D version.
In 3D each face is two-dimensional, and we can carve holes in each 2D face, which amounts to keeping the 1D lines of each face (just like the drawing below).
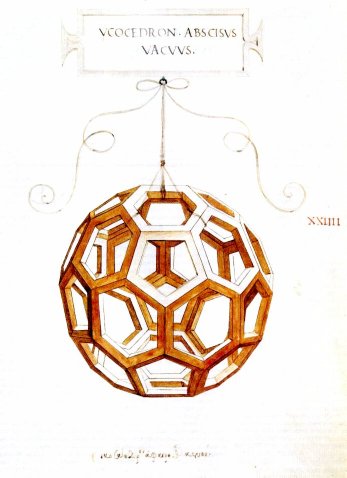
But in 4D each face is three-dimensional, so we can do two things! Take each 3D face (called a cell) and either make it hollow inside (which amounts to keeping its 2D faces, as before) or make each cell into something like the drawing below (which amounts to keeping its 1D lines).
I don’t want to spoil it but it looks cool when you turn on the 2D Face projection!
6. A static Klein bottle with a sphere that you can roll inside
This allows to get a feel for what “inside” a 2D Klein bottle in 4D even means. Also it makes it easier to look at the Klein Bottle while it is standing upright. In the past you had to use the anti-gravity feature… It is hard to keep the 4D version of the Klein Bottle upright because the Klein Bottle is a 2D object, and a 2D object in a 4D world is thin, like a 1D wire is thin in a 3D World.
7. A 120 cell (faces) and a sphere together
I made this to test the collision a while back. It’s fun to see the sphere push around or roll around inside the 120 Cell.
8. Auto-Follow the last touched shape
While active, your slice always moves to the position of the last shape you touched. It’s fun to use on marble scenes to follow a marble around at a weird slice orientation.
** As with the previous update, there is a page to the right of the level select hub. After you play the relevant levels the new buttons will be unlocked **

